|
ADVICE FROM THE EXPERTS
|
|
|
SKIING
Thinking about new skis? There are so many choice you will to consult a specialist to help you sort through some of the options. You will need to begin by determining your skill level, goals and the terrain you plan to ski. Test runs can be a great way to try out skis. Your favorite mountain most likely can tell you when they have demo day throughout the ski season.
What's Your skill Level? Recreational: You're a skier who's just getting started or a person enjoys slower speeds on easy to moderate terrain. You need skis that are forgiving and easy to control but that still allow you to tackle more challenging runs on occasion. Intermediate: You're an experienced skier who can control your speed, and you're ready to tackle steeper, more challenging terrain. You need skis that are responsive yet still a bit forgiving. Advanced/Expert: You ski with confidence, speed and aggressiveness on the steepest and most challenging terrain. To meet your demands and maximize your performance, you need responsive, high-tech sticks. Ski Categories All-Mountain: Designed for everything from groomed slopes to off-piste conditions with drops, jumps, bumps and powder. Generally, these skis have a waist (the narrow center area of a ski) of 70mm+ for stability and flotation.
Carving: Intended primarily for groomed areas, these range from developmental skis to aggressive, high-speed slalom models. Waists are often 68mm or less for easier turn initiation. Shorter models excel at quick turns; longer skis handle sweeping giant-slalom turns.
Powder: These skis have broad platforms and 90mm+ waists, giving you superb flotation in deep snow. Great for heli-skiing.
Twin Tip: These skis have adapted over the years to become more versatile for all-mountain use while still being ideal for terrain parks. They feature a curved-up tip at both ends of the ski for landing fakie (backwards).
Integrated skis: These skis are sold with bindings. (You'll find them listed under "ski and Binding Systems" here on our website.) The bindings are attached to the skis in such a way as to allow the skis to flex more evenly, thus increasing contact with the snow and enhancing performance.
Women's skis: Skis are available in men's and women's models. Women's skis are generally lighter weight and have a softer flex than most men's skis. Bindings on most of the women's models are positioned farther forward to increase stability and make turning easier. Women can, of course, go with any ski model appropriate for their ability and terrain preferences. Some women, however, especially those with smaller builds, find that lighter women's skis are easier to control.
Determining Ski Length Determine the appropriate ski length for you. There are a couple of basic guidelines in choosing skis with the right ski length. The ski length will vary as you progress- from short to longer skis, or nose-height skis at the start, then head-height when you feel a bit more confident. Things to consider are:
Bear in mind that having the proper fit is the most important thing to consider as far as ski boots are concerned. If you are finding the right pair for you, it really pays to know the various components as well as the features of ski boots. Try on as many boots as you can, compare their pros and cons. The more you know and understand about the boots and their features the happier you will be with your purchase.
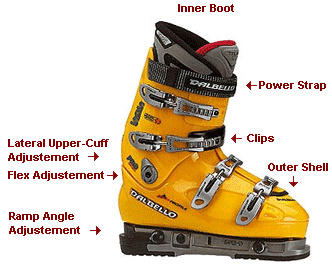
Plastic Outer Shell Ski boots typically have a stiff plastic outer shell that gives the ski boot its sturdy support and the most direct transfer of body movements to the skis. They protect your ankles and feet from bending too far and possible injury. The outer shell is waterproof and tough enough to protect your feet and lower legs from impacts. The outer shell size is very important in finding the right ski boot as it is always fixed and will not flex or change at all.
Inner Boot The padded inner bladder keeps your feet warm and the padding protects you from impacts. Different manufacturers make different kinds of liners for different kinds of feet. It is very important to make sure that the liner is snug and has the shape that matches your feet. The inner boot will change as you use your ski boot more. It will get compressed.
Power Strap The velcro strap at the top end of the ski boot can be used to make sure that the top of the ski boot gives a snug fit, connecting well with your calves and shin.
Entry Point Most common ski boots have either top or rear entry. Rear entry boots allow you to slide your foot into the boot from the rear. One or two clips are used for fastening the boot and adjusting the fit. Top entry boots use more clips and you need to insert your foot from the top. Mid-entry boots have both a flexible front and back side allowing you to slip your foot into the boot in the middle. In general, rear entry boots are easier to use but top entry boots give more support. Nevertheless, both ski boots have top end models that give both great comfort and fit.
Flex Adjustment This adjustment allows you to change the amount of resistance to the forward movement of your ankle. You can make this flex stiffer or softer. People often use this feature to compensate the flexibility changes of the boot under cold and warm weather conditions.
Forward Lean Adjustment This allows you to change the angle that your shin makes with the boot closed. By using this adjustment, you are able to change your stance and center of mass.
Lateral Upper-Cuff Adjustment This adjustment allows you to shift the upper boot. This feature is very useful for bowlegged or knock-kneed people who need to adjust their upper boot to the angle of their lower legs. Many boots only offer lateral upper-cuff adjustment, while some more advanced models offer this adjustment for the inner boot as well.
Ramp Angle Adjustment Some boots allow you to change the angle in which your feet rest on the sole of your boot. In this way, you are able to shift your center of mass forward or backward.
Ski-Walk Adjustment This adjustment allows the boot's upper cuff to hinge backward. This will give you the room you need for a more natural walking motion. Although this is a handy feature, most skiers choose for a more solid rear in favor of walking comfort.
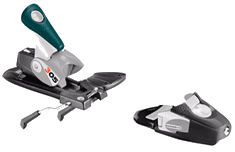
Ski bindings are very important in skiing together with your ski boots as they form the link between your body and your skis. Good ski bindings should give you a perfect balance between tightly gripping your ski boots and releasing when the pressure exceeds adjustable settings. The quality of your ski bindings is a very important safety issue and you should take the time and the money to select the right ski Bindings for your skiing needs. In this section, we will look into some guidelines in buying the appropriate ski bindings:
|
|
|
How to Choose a Snowboard A little basic knowledge goes a long way. If you have never purchased a snowboard before, you should begin with a trip to Anderson’s where the staff will walk you through all your options and help you determine which board will best suit you. Questions like, “What type of snowboarding will be doing?” or “How long have you been skiing/snowboarding?” will help us get to know you better. You will start to make decisions on board length, width, sidecut, flex, scoop and the materials used. Another great idea to get you started is by doing a demo.
You will need to select a board that fits your size and strength. You should have a budget to work with and don’t forget to take into consideration the boots and bindings.
What type of rider are you? All-Mountain riders want to explore the whole mountain. From packed powder to smooth groomed to the fluffy backsides – anything goes. Free riders are after speed on any terrain. Freestylers are after the fun of the halfpipe and snowparks.
What is your skill level? Don't try to be something you’re not. Decide what suits you and you will be more likely to have a great day on the slopes.
If you are a recreational snowboarder, you will most likely choose a soft-flexing snowboard that you can afford and one that you may grow out of. If you need a board that offers you more versatility and you are comfortable enough to hit all the terrains, you would consider yourself a performance snowboarder. Expert riders know what they want. You will most likely select an extra-stiff board with lots of pop for high-speed stability. Gender Many snowboards are designed with gender difference in mind. Women are generally shorter than men and children generally smaller than women. Women may desire a board that is softer, lighter and narrower. Children should also select a board that fits their smaller feet and height. The physical differences should play a large part in the selecting the board you purchase and will ultimately effect how much fun you have.
Length When determining the correct board length, you should also factor in terrain/snow conditions and your weight & height. In general, shorter boards are more maneuverable while longer boards are more stable yet take more energy to control.
A good way to judge. Stand the board in front of the child or adult, if its height comes between the chin and nose, this board would be considered a good length. Let’s move onto how your weight plays a part in purchasing your new snowboard.
Shorter boards are easier to maneuver. They are great to learn on and are preferred by riders who do a lot of trick, park and pipe riding. Medium boards standing on end will come up between your chin and nose. This length is for the all around intermediate to advanced rider who may ride a variety of terrain, including parks and steeps. Long boards go from eye-level to several inches over the top of the head. Long boards are for high-speed carving, deep powder and big mountain terrain.
Weight If you are lighter in weight you will want to select a board that is shorter so you will have the greatest ability to maneuver over terrain. If you are a bit heavier, you can select a longer board that will allow you better floatation. Riders who are heavy for their height can stay within these guidelines, but should look for boards that have a stiffer flex. Lighter riders will need boards with a softer flex. Also, remember that these are general guidelines to get you started; personal preference can also strongly sway your decision of what length board to buy.
Suggested ReadingHow To Snowboard For The First Time Bindings are simple, put one foot in the base of each binding, bend down and buckle two or three straps across your boot to secure them to the snowboard. You and the board are now one - until the next chair lift ride. Now bend down again and un-strap the rear binding. Ride chair. Re-strap. Ride down. Repeat. Step-in-bindings are new to the snowboarding scene over the last few years. This system lets the user step down and with one easy click their boot is automatically attached to the board. The decision between strap or step-in in up to you. Let’s look at the pros and cons of each type of binding. Step-in pros: Quick and easy. Step in and start boarding. The boots may be a bit stiffer but offer a quicker edge and response time. skiers transitioning from skis find the transition easier because they are used to just stepping in their skis and going. Step-in cons: due to the stiffer boot, there may be a loss of balance that takes place initially, not as many on the market and may tend to be a bit more costly but getting better every year.
Strap system pros: The boots and bindings are sold independently. Any soft boot can pretty much go with any strap binding on the market offering a lot of choices for the consumer, who can buy any brand of boots this year any brand of bindings next year, for example. With a large selection, consumers have a better chance of locating the boot that fits them the best. Strap systems are usually cheaper than the step-ins. The feel of the strap bindings still outweighs the step-in bindings Strap system cons: Slow to get in and out of at the end of each chair ride. Takes time to adjust the straps properly. How to Purchase Snowboard Boots.
The Process It will no doubt be difficult to locate a boot that you like, fits right and performs well. If you start by asking the pros you will certainly make the process faster and more enjoyable.
Your Preference Start by understanding that selecting a boot a personal preference. You can’t listen to your friends or buy boots because you like the snowboarder that advertises for a particular line. Whether you purchase a traditional strap boot or the new step-in boot this process will take some time to determine. Ultimately, you have to wear it so don’t cut corners when deciding on your boot. At Anderson’s, we have experienced technicians who will take the time needed to make sure you purchase a boot that best fits your foot shape.
Your Foot Everyone has unique shaped feet. Boots will not easily mold to your foot. Expect the process to take hours, not minutes. Even with the best guidance, you should plan to try on a variety of different brands, models and sizes. When you think you have found the right boot, leave it on your feet and walk around the shop for 10 or 15 minutes. Flex repeatedly to seat the foot and start the foams compressing. Make sure you check for ‘heel lift’. This is when you bend at the knees and your heals come up from the ground. Your heals should be securely in place – if not, tell the technician fitting you. They can recommend some aids to eliminate heal lift.
Size Matters Don’t purchase boots that are too big. A good fitting boot feels tight out of the box and may remain very snug during the first few days of riding. Wear socks that you would wear while boarding (one single pair of medium weight is best). Relax. Your boot will. Most boots will compress and feel more comfortable after two or three runs. Injuries from oversized boots can range from fatigue, broken bones or inability to maintain stability and control. |
|
|
|
|


